Ingredients
Base (crust)
- 300 g digestive biscuits or graham crackers
- 120 g melted butter
- 2 tablespoons sugar (optional)
Creamy filling
- 500 g cream cheese (room temperature)
- 1 cup (240 ml) heavy whipping cream (cold)
- 1 cup powdered sugar
- 1 teaspoon vanilla extract
- ½ cup coconut milk or regular milk
- 2 tablespoons gelatin powder (or 10 g agar agar)
- 5 tablespoons warm water
Topping
Choose one:
- crushed biscuits
- shredded coconut (toasted)
- cookie crumbs
- white chocolate shavings
🍳 Equipment
- 8–9 inch springform pan
- Food processor or blender
- Mixing bowls
- Hand mixer or whisk
- Spatula
- Fridge
👩🍳 Step-by-Step Instructions
Step 1 – Make the crust
Crush biscuits until very fine.
You can:
• blend in food processor
OR
• put in bag and crush with rolling pin
Texture should look like sand.
Add:
- melted butter
- sugar
Mix until it looks like wet crumbs.
Press mixture firmly into the pan bottom.
Use glass or spoon to compact it tightly.
Very important:
👉 press HARD so crust holds together.
Chill in fridge 20–30 minutes to set.
Step 2 – Prepare gelatin
In a small bowl:
Add gelatin + warm water.
Let sit 5 minutes to bloom.
Then microwave 10–15 seconds until dissolved.
Do NOT boil.
Set aside to cool slightly.
(This step helps cheesecake hold shape without baking.)
Step 3 – Whip the cream
In a cold bowl, add heavy cream.
Beat until:
✔ thick
✔ fluffy
✔ soft peaks form
Like whipped cream.
Put in fridge while preparing filling.
Cold cream whips better.
Step 4 – Make cream cheese filling
In large bowl:
Add:
- cream cheese
- powdered sugar
- vanilla
Beat until smooth and creamy.
No lumps.
This is your base flavor.
Now add:
- coconut milk or milk
- dissolved gelatin
Mix well.
Step 5 – Combine whipped cream
Gently fold whipped cream into cream cheese mixture.
Do NOT mix aggressively.
Use spatula and fold slowly.
We want to keep air → fluffy texture.
The mixture should look:
smooth + light + mousse-like.
This is the magic moment 😍
Step 6 – Assemble
Take crust from fridge.
Pour filling on top.
Spread evenly.
Tap pan lightly to remove air bubbles.
Smooth surface with spatula.
Step 7 – Chill
Refrigerate at least:
❄️ 4–6 hours
or best → overnight
This allows:
✔ gelatin to set
✔ flavors develop
✔ perfect slices
Don’t rush this step.
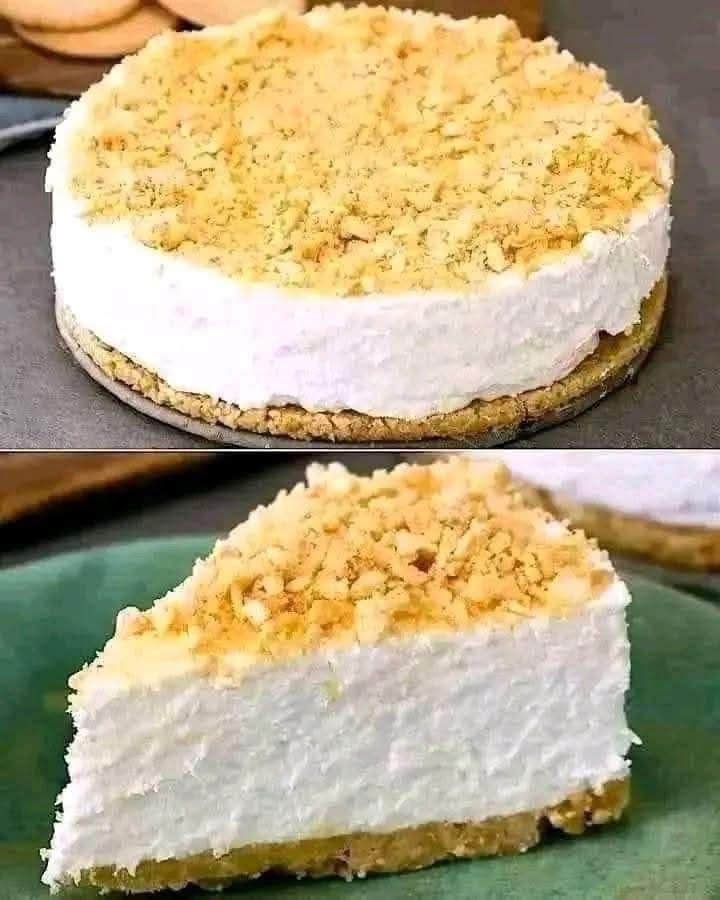
Step 8 – Decorate
Before serving:
Add topping:
- crushed biscuits
OR - toasted coconut
OR - cookie crumbs
Gives crunch + beautiful look like photo.
Step 9 – Slice & serve
Run knife around edges.
Release springform.
Slice with clean knife.
You’ll get:
tall creamy slices that hold shape perfectly.
So satisfying 😄
🥥 Texture & Taste
This cheesecake is:
• creamy
• airy
• silky
• lightly sweet
• cool & refreshing
• buttery crust
• soft melt-in-mouth filling
It’s lighter than baked cheesecake but still rich.
One slice is never enough.
🔥 Pro Tips
Room temperature cream cheese
Prevents lumps.
Cold whipping cream
Whips faster.
Press crust firmly
Prevents crumbling.
Chill long enough
Too soft if rushed.
Use springform pan
Easy removal.
🍓 Flavor Variations
Strawberry
Add strawberry puree or jelly on top
Chocolate
Add melted chocolate to filling
Oreo
Use Oreo crust
Lemon
Add lemon zest + juice
Mango
Add mango puree layer
Nutella
Swirl Nutella inside
🍽 Serving Ideas
Serve with:
• fresh fruit
• chocolate drizzle
• caramel
• espresso
• tea
• coffee
Perfect for hot weather desserts.
❄️ Storage
Fridge
Up to 5 days
Freezer
2 months (slice first)
Eat frozen = ice cream cake vibe 😍
❤️ Why You’ll Love It
✔ No oven
✔ Easy
✔ Cheap ingredients
✔ Looks fancy
✔ Super creamy
✔ Great for guests
✔ Make ahead
✔ Beginner friendly
It’s one of those “everyone asks for the recipe” desserts.