Why These Potato Balls Are So Popular
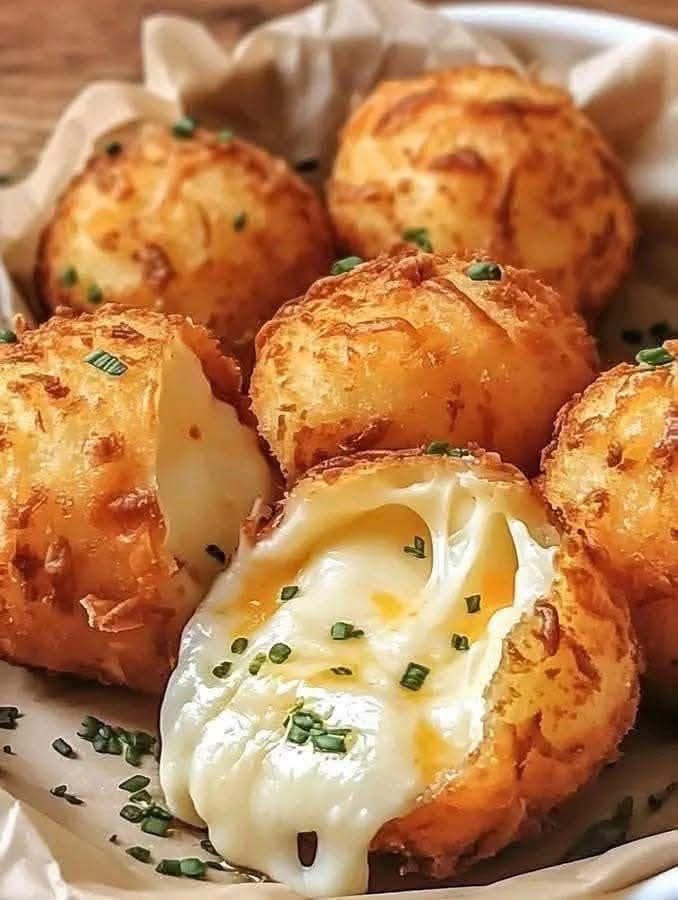
What makes these potato balls special is the contrast of textures:
- A crispy, well-seasoned crust
- A smooth, mashed-potato interior
- A melting cheese core that stays creamy, not oily
They are filling, comforting, and versatile. You can serve them for breakfast, brunch, snacks, or even as a side dish for dinner.
Texture & Flavor Profile
- Outside: Crunchy, golden, lightly crisp
- Inside: Soft, fluffy potato
- Center: Creamy, stretchy melted cheese
- Flavor: Savory, buttery, slightly herby
The mild potato flavor allows the cheese to shine, while the crust adds satisfying crunch.
Ingredients List
For the Potato Mixture
- 1 kg (2.2 lb) potatoes, peeled
- 2 tablespoons unsalted butter
- ½ cup milk (warm)
- 1 teaspoon salt
- ½ teaspoon black pepper
- ½ teaspoon garlic powder
- ½ teaspoon paprika (optional)
- 2 tablespoons chopped chives or parsley
For the Cheese Filling
- 200–250 g mozzarella cheese (or any good melting cheese)
- Cut into small cubes
For Coating
- 1 cup all-purpose flour
- 2 large eggs
- 2 tablespoons milk
- 1½ cups breadcrumbs (panko recommended)
For Frying
- Vegetable oil (enough for deep frying)
Choosing the Right Potatoes
Use starchy potatoes such as:
- Russet
- Idaho
- Maris Piper
These potatoes mash smoothly and create a fluffy interior. Avoid waxy potatoes, which can become dense or gummy.
Step 1: Cooking the Potatoes
Cut the peeled potatoes into evenly sized chunks.
Place them in a large pot and cover with cold, salted water. Starting with cold water helps the potatoes cook evenly.
Bring to a boil, then reduce to a gentle simmer and cook for 15–20 minutes, or until the potatoes are fork-tender.
Drain thoroughly and return the potatoes to the hot pot for 1–2 minutes to evaporate excess moisture. This step is essential for a dry, fluffy mash.
Step 2: Making the Mashed Potato Base
Mash the potatoes while they are still hot.
Add:
- Butter
- Warm milk
- Salt
- Black pepper
- Garlic powder
- Paprika
Mash until smooth and lump-free. Do not overmix—overworking potatoes can make them gluey.
Stir in chopped herbs and let the mixture cool completely. Warm potatoes are too soft to shape properly.
Step 3: Preparing the Cheese Filling
Cut the cheese into small cubes, about 2–3 cm in size.
Keep them cold in the refrigerator until ready to use. Cold cheese melts more slowly, helping prevent leaks during frying.
Step 4: Shaping the Potato Balls
Take about 2 tablespoons of potato mixture and flatten it in your palm.
Place one cube of cheese in the center.
Carefully wrap the potato mixture around the cheese, sealing it completely. Roll gently into a smooth ball.
Make sure there are no cracks—any opening can cause cheese to leak out while frying.
Repeat until all potato mixture is used.
Step 5: Setting Up the Breading Station
Prepare three shallow bowls:
- Flour
- Egg wash (eggs beaten with milk)
- Breadcrumbs
Roll each potato ball in flour first, shaking off excess. This helps the egg adhere.
Dip into the egg wash, coating completely.
Roll in breadcrumbs, pressing gently so the crumbs stick evenly.
For extra crispiness, repeat the egg and breadcrumb steps for a double coating.
Step 6: Chilling Before Frying (Very Important)
Place the breaded potato balls on a tray and refrigerate for 30 minutes.
This step:
- Firms up the coating
- Prevents bursting
- Helps maintain shape
Do not skip this step for best results.
Step 7: Frying the Potato Balls
Heat oil in a deep pan to 170–175°C (340–350°F).
Carefully lower the potato balls into the hot oil in small batches. Do not overcrowd.
Fry for 3–4 minutes, turning gently, until golden brown on all sides.
Remove with a slotted spoon and place on paper towels to drain excess oil.
How to Know They’re Perfectly Cooked
Perfect potato balls are:
- Deep golden brown
- Crisp to the touch
- Hot all the way through
When cut open, the cheese should flow smoothly without being watery.
Serving Suggestions
Serve immediately while hot.
They pair beautifully with:
- Garlic aioli
- Spicy mayo
- Sour cream
- Marinara sauce
- Chili sauce
Garnish with chopped chives or parsley for freshness.
Flavor Variations
Cheddar Potato Balls
Use sharp cheddar for a bolder flavor.
Herb & Cheese Balls
Add thyme, oregano, or rosemary to the potato mixture.
Spicy Version
Mix chili flakes or cayenne into the potatoes.
Bacon & Cheese
Add finely chopped cooked bacon to the potato mixture.
Oven-Baked Option
Brush with oil and bake at 200°C (400°F) for 20–25 minutes, turning once.
Tips for Success
- Cool potatoes completely before shaping
- Seal cheese fully to prevent leaks
- Chill before frying
- Use medium heat oil, not too hot
- Fry in small batches
These details ensure a crisp crust and molten center.
Storage and Reheating
Store leftovers in the refrigerator for up to 2 days.
Reheat in:
- Oven at 180°C (350°F)
- Air fryer for best crispiness
Avoid microwaving—it softens the crust.
Common Mistakes to Avoid
- Using warm mashed potatoes
- Overfilling with cheese
- Skipping chilling step
- Frying at too high temperature
- Crowding the pan
Avoiding these mistakes guarantees perfect results.
Nutritional Notes
These potato balls are rich and satisfying. Potatoes provide carbohydrates and fiber, while cheese adds protein and calcium. Enjoy as an occasional treat.
Why This Recipe Works
This recipe balances moisture, structure, and heat. The mashed potato mixture is firm enough to hold shape, the chilled coating protects the cheese, and controlled frying ensures crispness without burning.
It’s simple technique done right.
Final Thoughts
Crispy cheese-stuffed potato balls are a timeless comfort food that never disappoints. With their crunchy exterior and irresistibly melty center, they are guaranteed to be a crowd-pleaser.
Whether you serve them as a snack, appetizer, or side dish, these golden potato balls bring warmth, comfort, and pure satisfaction in every bite.