Ingredients You Need
Base Layer
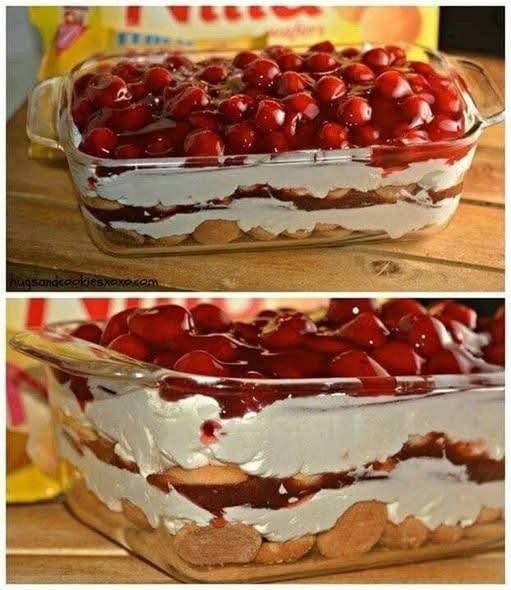
- 1 package vanilla wafers, ladyfingers, or graham crackers
(about 2 cups if crushed)
Cream Cheese Layer
- 16 oz (450g) cream cheese, softened
- 1 cup powdered sugar
- 1 teaspoon vanilla extract
- 2 cups whipped cream or whipped topping
Cherry Layer
- 1 can cherry pie filling
(or homemade cherry sauce)
Optional Add-Ins
- ½ teaspoon almond extract (pairs beautifully with cherry)
- Fresh cherries for topping
- Chocolate curls or crushed nuts
- Lemon zest in the filling
Preparing the Cream Cheese Filling
Step 1 – Beat the Cream Cheese
In a large bowl, beat cream cheese until very smooth and creamy.
Softening beforehand prevents lumps.
Step 2 – Add Sugar and Vanilla
Mix in powdered sugar and vanilla until light and silky.
Taste and adjust sweetness if desired.
Step 3 – Fold in Whipped Cream
Gently fold whipped topping into the mixture.
Do not overmix—keep it fluffy to help the layers stand tall.
Assembling the Dessert
Step 1 – Create the Cookie Base
Lay vanilla wafers or ladyfingers in the bottom of a glass dish.
Cover every corner—this forms your crust.
Tip: For softer layers, dip cookies in milk for 3 seconds before placing them.
Step 2 – Add the First Cream Layer
Spread half of the cream cheese filling evenly over the cookies.
Step 3 – Add Cherry Layer
Spoon cherry pie filling over the cream cheese layer.
Be generous—this adds color, tartness, and shine.
Step 4 – Repeat Layers
Add another layer of cookies, another cream layer, and top with more cherries.
Step 5 – Smooth and Chill
Cover dish with plastic wrap and refrigerate at least 4 hours, or overnight for perfect slices.
Serving Suggestions
This dessert is delightful straight from the fridge, but you can dress it up even more:
Garnish Ideas
- Chocolate shavings
- Whipped cream rosettes
- Fresh whole cherries
- Crushed graham crumbs
- Toasted almonds
Recommended Pairings
- Coffee or iced latte
- Hot tea
- Vanilla ice cream
- Lemonade for a refreshing balance
Great for:
- Family dinners
- Holiday buffets
- Birthday tables
- Valentine’s Day
- Mother’s Day brunches
Tips for Best Results
Use Soft Cream Cheese
Cold cream cheese makes the filling grainy.
Chill Time Matters
The longer it chills, the better the texture.
Try a Crunchier Base
Use crushed graham crackers mixed with a little melted butter for a firm crust.
Make Smaller Servings
Layer in jars for individual desserts—cute and convenient.
Turn It Chocolate
Swap vanilla cookies for chocolate wafers or Oreo crumbs.
Fun Variations
Mixed Berry Cheesecake Delight
Use blueberry, raspberry, or triple berry topping instead of cherry.
Tropical Version
Spread crushed pineapple between layers and top with coconut.
Peanut Butter Twist
Blend a couple of tablespoons peanut butter into the cream cheese for a dreamy combo with cherry.
Gluten-Free
Use gluten-free graham crackers or simple sugar-free cookies.
How to Store
Refrigerator
Keeps well for 3–4 days covered tightly.
Freezer Option
Freeze up to 1 month
Thaw in refrigerator until soft enough to slice.
Why You’ll Love It
This no-bake cherry cheesecake delight wins every time:
- Fast to assemble
- No oven required
- Creamy, sweet, tangy layers
- Cheap ingredients
- Crowd-pleasing flavor
- Great make-ahead dessert
It’s the perfect balance of convenience and indulgence.
Conclusion
This dreamy no-bake cherry cheesecake delight offers all the flavors of a classic cherry cheesecake—but with half the effort. Layers of soft cookies, rich cream cheese filling, and juicy cherry topping come together to create a dessert that looks gorgeous and tastes unforgettable.
Whether you’re hosting guests or treating yourself, every bite delivers comfort, sweetness, and a pop of fruitiness.