Introduction
Some desserts impress with appearance, others with flavor—this one does both effortlessly.
The Snowball Biscuit Custard Cake combines the simplicity of homemade biscuit balls with a silky custard bath that bakes into a creamy, magical treat.
Each “snowball” is tender, lightly sweet, and dusted with powdered sugar.
Once placed into a tin, they are covered with a smooth vanilla custard that seeps in and transforms everything into a pudding-like masterpiece.
It’s a delicious twist on classic biscuit desserts that:
- looks bakery-fancy
- uses everyday ingredients
- needs no special tools
- and works for any season or gathering
Serve it warm or chilled—it’s comfort in every bite.
🧾 Ingredients
✨ For the Snowball Biscuits
- 2 cups all-purpose flour
- ¼ cup sugar
- 1 teaspoon baking powder
- 1 stick (½ cup) cold butter, cubed
- 1 egg
- ½ cup milk or buttermilk
- 1 teaspoon vanilla extract
- Powdered sugar for coating
✨ For the Custard
- 3 cups milk
- ½ cup sugar
- 3 tablespoon cornstarch
- 3 egg yolks
- 1 teaspoon vanilla extract
- Pinch of salt
(Optional: 1 tablespoon butter for silkiness)
✨ For Topping
- More powdered sugar
- Cinnamon (optional)
- Toasted nuts or coconut flakes (optional)
🥣 Step 1: Make the Snowball Dough
Soft, short, and buttery
- In a bowl, mix flour, sugar, and baking powder
- Add cold butter cubes
- Rub in with fingers until mixture looks sandy (like coarse crumbs)
- Whisk egg, milk, vanilla together
- Pour into the dry mixture and stir until a dough forms
👉 Tip:
Don’t overwork it—this keeps biscuits soft and tender.
🍡 Step 2: Shape and Bake the Balls
Turning dough into snowballs
- Preheat oven to 350°F / 180°C
- Pinch off pieces of dough and roll into small balls—about 1 inch diameter
- Place on a baking tray lined with parchment
- Bake 10–12 minutes, until just set (light color, not brown)
- Cool slightly and roll in powdered sugar
Set them aside while you make the custard.
🍮 Step 3: Make the Custard
Smooth, silky, vanilla perfection
- Heat 2½ cups of milk in a saucepan
- In a bowl, whisk remaining milk with sugar, cornstarch, egg yolks, salt
- Slowly pour warm milk into egg mixture (temper) while whisking
- Return everything to the pot
- Cook on medium heat, stirring constantly
- When thickened, remove from heat
- Stir in vanilla and butter (optional)
The custard should be thick enough to coat the back of a spoon.
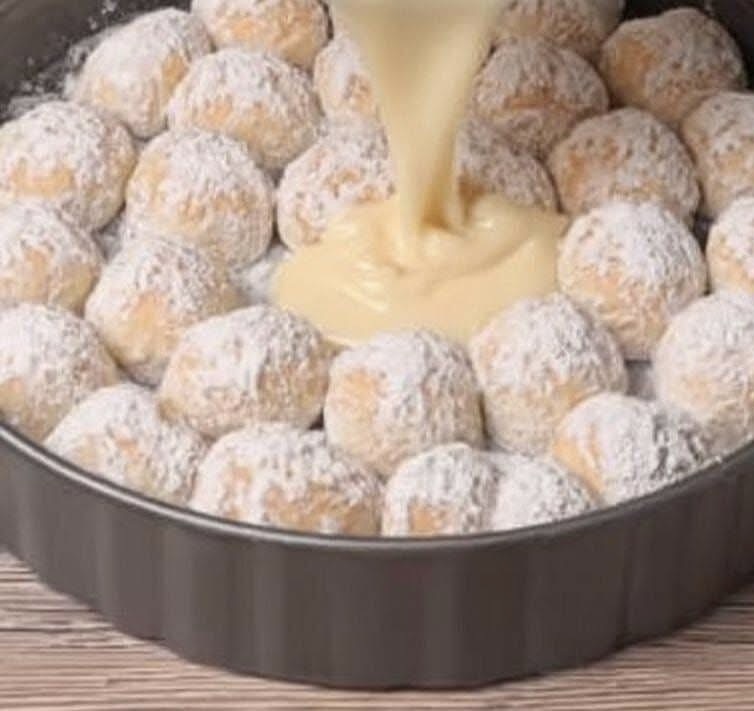
🧩 Step 4: Assemble the Cake
Where the magic happens
- Grease a shallow baking dish or pie pan
- Arrange snowball biscuits snugly around the bottom
- Pour warm custard evenly over the balls
(just like your photo 😍)
The custard will seep into the gaps and partially soak the biscuits.
🔥 Step 5: Bake to Golden Creaminess
Preheat oven (if cooled) to 350°F / 180°C
Bake 20–25 minutes until custard is set and surface lightly browned in spots.
The biscuits soften slightly and the custard becomes luscious.
Let cool 10–15 minutes before slicing.
😍 The Result
Prepare to fall in love:
- A velvety custard layer hugging every biscuit
- Soft, tender snowballs that practically melt
- A beautiful rustic dessert that looks like it took hours (but didn’t!)
Sprinkle powdered sugar and cinnamon before serving for a picture-perfect finish.
❄️ Serving Ideas
This dessert is heavenly:
- Warm — comfort food mode
- Chilled — pudding-like texture
- With whipped cream
- With fresh berries
- With caramel drizzle (omg yes!)
Pairs wonderfully with hot coffee or iced tea.
🔄 Variations
Customize your snowball masterpiece!
🍫 Chocolate Version
Add 2 tbsp cocoa to dough
Use chocolate chips inside the balls
Replace ¼ cup milk with melted chocolate in custard
🥥 Coconut Cream
Add shredded coconut to dough
Swap vanilla for coconut extract
Top with toasted flakes
🍋 Lemon Dream
Add zest of 2 lemons to custard
Replace vanilla with lemon juice
Dust with powdered sugar + zest
🍓 Fruit Surprise
Place sliced strawberries or peaches between layers
Pour custard as usual and bake
🧊 Storage
Store covered in fridge up to 4 days
Best eaten within 48 hours for texture
Warm gently in microwave if desired
Avoid freezing (custard can separate)
🧠 Why This Recipe Works
- Tiny biscuits increase surface area → more custard absorption
- Cornstarch stabilizes custard for baking
- Butter-rich dough stays tender under sauce
- Layers fuse during baking → one perfect texture
Simple science = incredible results.
🎉 Conclusion
The Snowball Biscuit Custard Cake delivers everything a dessert lover wants: soft texture, creamy richness, sweet vanilla aroma, and impressive presentation.
It takes familiar ingredients and turns them into something special—comforting, beautiful, and unforgettable.