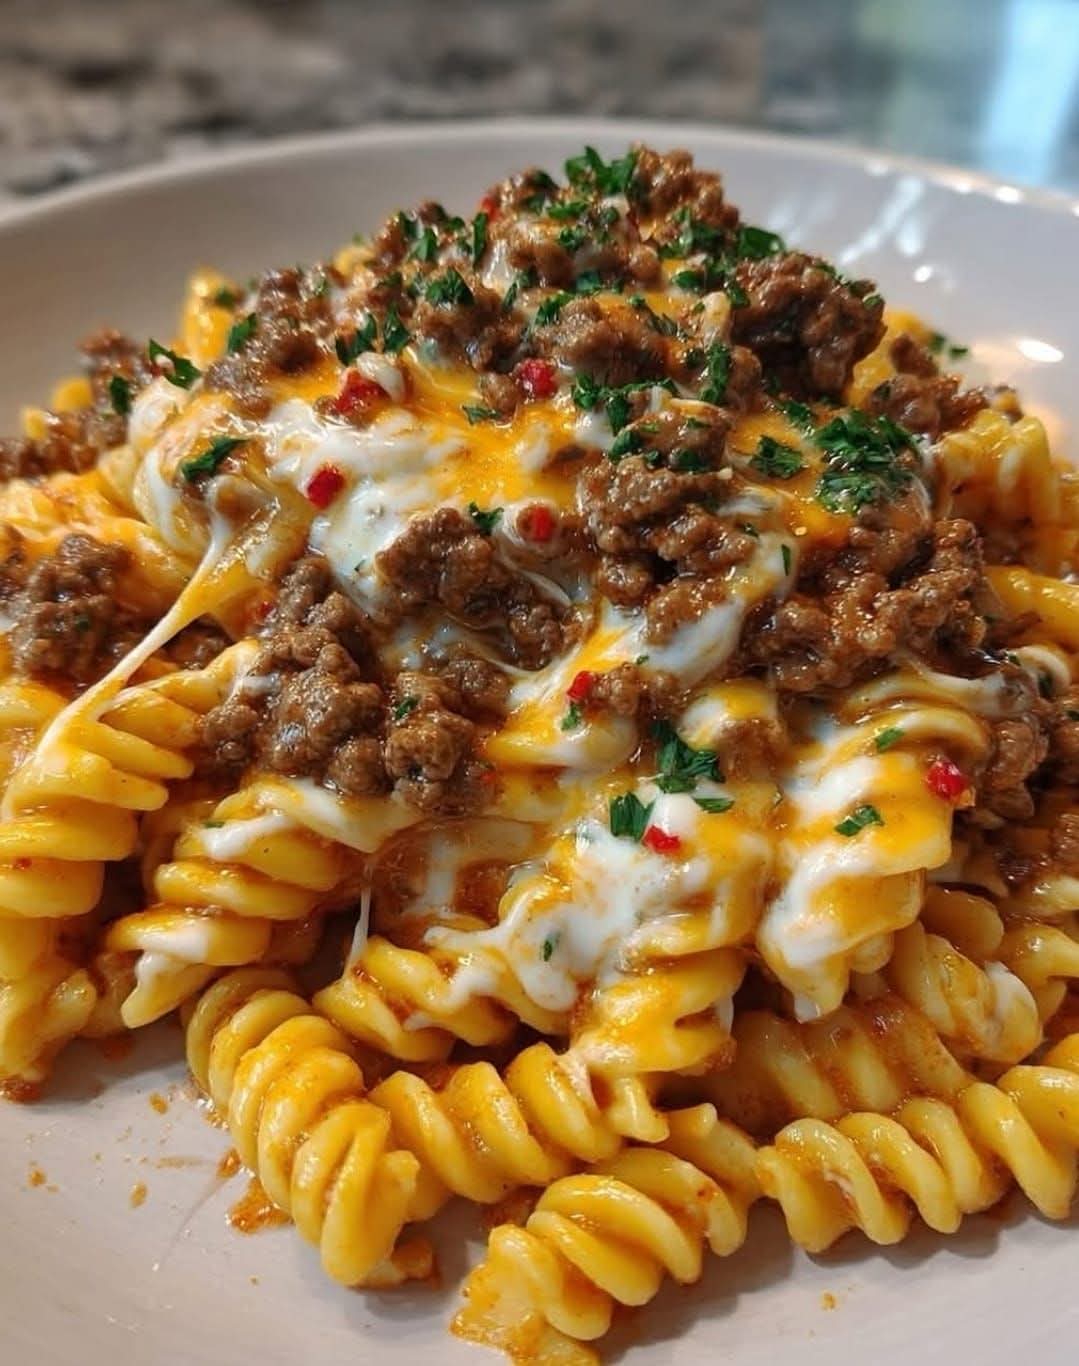
The Cheesy Beef Rotini, as captured in your recent culinary gallery, is a masterclass in textures, blending the springy “corkscrew” structure of rotini pasta with a rich, melted cheese canopy and deeply seasoned ground beef. This dish represents a sophisticated, home-style alternative to your Creamy Chicken and Pasta Bake, shifting the focus from a white bechamel base to a robust, meat-forward profile that relies on the “pull” of melted cheddar and mozzarella.
Achieving the specific “leopard-spot” cheese melting and the distinct separation of beef crumbles seen in your photo requires technical precision in starch management and fat emulsification.
1. The Anatomy of an Elite Beef Rotini
A professional-grade pasta bake is defined by its “clutch”—the ability of the sauce and cheese to adhere to every twist of the pasta. Based on your image, this dish achieves success through four critical layers:
- The Rotini Architecture: The spiral shape of the pasta is chosen specifically for its high surface area, which acts as a “trap” for both the fine beef crumbles and the molten cheese.
- The Umami Beef Crumbles: Ground beef that has been seared to a deep mahogany brown, ensuring the Maillard reaction provides a savory depth that balances the creamy dairy.
- The “Marbleized” Cheese Melt: A dual-tone blend of white and orange cheeses (likely Mozzarella and Sharp Cheddar) that has been broiled until the white cheese strings and the cheddar oils bloom, creating the visual “pull” seen in your photo.
- The Piquant Garnish: Fine flecks of fresh parsley and small bits of red chili or bell pepper that provide a necessary “acidic lift” and a pop of color against the rich tones of the meat.
2. Technical Precision: Starch and Protein Management
To replicate the professional results seen in your image, you must manage the “pasta-to-meat” ratio with scientific care.
The “Al Dente” Spiral
Pasta in a cheesy bake undergoes a secondary “steam cook” once the cheese is applied. To prevent the spirals from losing their definition:
- The Two-Minute Rule: Boil the rotini for exactly two minutes less than the “Al Dente” instruction on the package. The pasta should still have a firm “bite” in the center, which will soften perfectly as the cheese melts over it.
The “Dry-Sear” Beef Method
Notice how the beef in your photo isn’t “clumpy” or gray, but rather distinct, dark crumbles?.
- High Heat: Sear the beef in a cast-iron or heavy-bottomed skillet without crowding the pan.
- Fat Management: Drain 80% of the rendered fat, but keep 20% to help emulsify the cheese. This prevents the “oily pool” often found in lesser pasta bakes while maintaining the “glossy” finish seen in your presentation.
3. Flavor Profiles: Balancing the Heavy Umami
The Cheesy Beef Rotini relies on a “Savory-Sharp” axis.
- The Herb Contrast: The fine parsley in your photo is not just for decoration. It provides a bitter, fresh counterpoint to the heavy fats of the beef.
- The Red Pepper “Snap”: The small red inclusions (likely chili flakes or finely diced pepper) provide a “bright” flavor note that keeps the palate from becoming overwhelmed by the richness of the cheese.
- Aromatic Base: Underneath the cheese, a foundation of garlic and onion powder (or sautéed aromatics) provides a lingering warmth that bridges the gap between the pasta and the protein.
4. Nutritional Profile: High-Energy Recovery Meal
This dish serves as a robust source of protein and essential minerals, making it an ideal “recovery” meal.
| Component | Benefit |
| Ground Beef | Rich in Heme-Iron and Zinc, crucial for oxygen transport and immune function. |
| Durum Wheat Rotini | Provides complex carbohydrates for sustained energy release. |
| Blended Cheeses | A dense source of Calcium and Vitamin B12. |
| Fresh Parsley | Offers Vitamin K and antioxidants to balance the meal. |
5. Aesthetic Staging for the Perfect “Pasta Shot”
To achieve the professional “mound” look seen in your photo, follow these staging principles:
- The “Center-Heap” Technique: Don’t spread the pasta flat. Use a large spoon to heap the rotini in the center of a shallow bowl, creating height. This allows the cheese to “cascade” down the sides, as seen in your image.
- Top-Down Garnishing: Apply the fresh herbs and red peppers only after the cheese has been melted. This ensures they don’t wilt or lose their vibrant color during the heating process.
- The “Cheese String” Capture: To get the effect seen in your photo, photograph the dish while it is piping hot. This is when the mozzarella is at its highest elasticity, creating those beautiful “bridges” between the spirals.
6. Frequently Asked Questions (FAQ)
Why does my cheese sometimes separate into oil?
This usually happens if the heat is too high or if you use “pre-shredded” cheese from a bag. Pre-shredded cheeses are coated in potato starch to prevent sticking, which can cause the cheese to break. For the “glossy” finish in your photo, grate your own cheese from a block.
Can I make this vegetarian?
Absolutely. You can substitute the beef for sautéed mushrooms or a plant-based crumble. To maintain the “meaty” umami seen in your photo, ensure you sear the mushrooms until they are dark brown before adding the pasta.
What is the best way to reheat this?
To keep the pasta from drying out, add a tablespoon of water or milk to the bowl and cover it before microwaving. This creates a “steam chamber” that re-hydrates the starch and softens the cheese back to its original “pull”.
7. Culinary Inspiration: Integrating Your Collection
The Cheesy Beef Rotini is a versatile anchor that pairs perfectly with other elements from your gallery:
- The Bread Pairing: Serve this alongside your Soft Pan Flatbread—it is the perfect vessel for scooping up the extra beef and melted cheese from the bottom of the bowl.
- The Vegetable Balance: Follow the lead of your Chicken Platter and serve a side of sautéed green beans to provide a crisp texture that offsets the soft pasta.
- The “Dessert Finish”: After such a savory, heavy meal, a light and airy Velvety Caramel Flan Muffin provides the perfect sweet conclusion.
- The “Spice Swap”: If you want to increase the heat, take inspiration from your Green Chile Cheese Pie and fold in roasted green chiles instead of the red peppers for a Southwestern twist.