The Brownie Bottom Mini Cheesecake, as captured in your professional pastry showcase, is a sophisticated evolution of the classic American dessert. This confection abandons the traditional, crumbly graham cracker base in favor of a dense, fudgy brownie foundation, creating a striking visual and textural contrast between the dark cocoa base and the ivory-toned cheesecake. While your Chocolate Cherry Swiss Roll focuses on the delicate elasticity of a sponge, these mini cheesecakes prioritize structural density and a “triple-layer” flavor profile consisting of cake, custard, and ganache.
Achieving the sharp, clean lines visible in your photo, where the layers remain distinct without bleeding into one another, requires precise thermal management and specific ingredient ratios. This guide explores the culinary engineering, assembly techniques, and aesthetic principles behind this high-end dessert.
1. The Anatomy of a Gourmet Mini Cheesecake
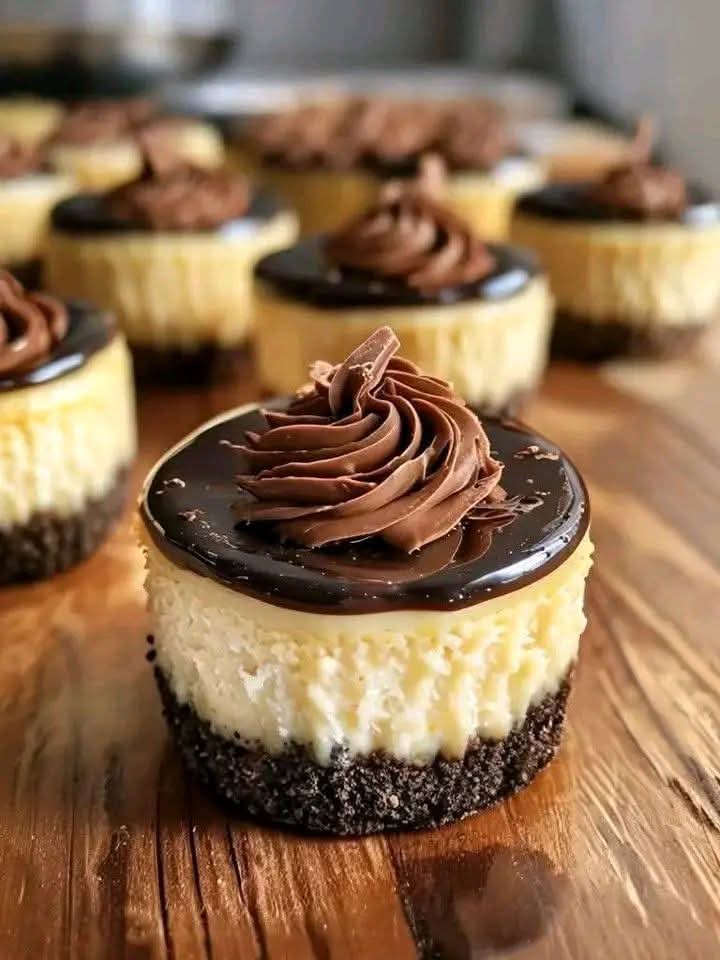
A premium mini cheesecake is defined by its vertical symmetry and the quality of its finish. Based on the visual evidence in your photo, this dessert is built on four critical components:
- The Fudgy Brownie Foundation: A dark, cocoa-rich base that serves as the anchor; it must be dense enough to support the weight of the cheesecake without becoming soggy.
- The Silky Cheesecake Middle: A smooth, New York-style cheesecake layer made from high-fat cream cheese and eggs, providing a tangy counterpoint to the sweet chocolate.
- The Glossy Ganache Cap: A thin layer of dark chocolate ganache that provides a professional, reflective sheen and acts as a “glue” for the final garnish.
- The Whipped Chocolate Rosette: A stiff-peak chocolate mousse or stabilized whipped cream piped in a star-tip pattern, adding height and an airy texture to the final bite.
2. Technical Precision: Mastering the Dual-Bake Method
The primary challenge of this dessert is that brownies and cheesecakes require different baking environments. To achieve the perfect results seen in your image:
The “Pre-Bake” Strategy
- Brownie Layer: The brownie batter is piped into the bottom of a silicone or lined mini-cheesecake pan and baked until about 75% done. If you bake them fully before adding the cheesecake, the bottom will become rock-hard after the second bake.
- Thermal Shock Avoidance: The brownie base must cool slightly before the cheesecake batter is added. Adding cold cheesecake batter to a piping-hot brownie can cause the fats to separate.
The Low-Temperature Cheesecake Bake
To get the perfectly flat, crack-free surface shown in your photo:
- Steam Oven Simulation: Bake these at a low temperature, around 300°F (150°C), with a pan of water on the bottom rack of the oven. This creates a humid environment that prevents the cheesecake from drying out and cracking.
- The “Jiggle” Test: The cheesecakes are done when the edges are set but the very center has a slight wobble. They will continue to firm up as they cool in the refrigerator.
3. Flavor Bridges: Balancing Bitterness and Tang
Your Brownie Bottom Mini Cheesecakes utilize a specific flavor architecture to prevent “sugar fatigue”:
- Dark Cocoa vs. Lactic Acid: The bitterness of the dark chocolate brownie (likely using 70% cocoa) is balanced by the natural lactic tang of the cream cheese.
- The Salt Component: A pinch of sea salt in the brownie layer is essential; it enhances the chocolate flavor and makes the tanginess of the cheesecake “pop.”
- Textural Contrast: The soft, cloud-like quality of the piped rosette on top provides a final layer of sensory interest compared to the dense, chewy brownie bottom.
4. Nutritional Profile: Dense Energy with Antioxidants
While this is a celebratory dessert, it incorporates ingredients with significant functional benefits.
| Component | Key Nutrient | Functional Benefit |
| Dark Chocolate | Flavonols | Supports cardiovascular health and provides a mood-boosting effect. |
| Cream Cheese | Vitamin A | Essential for maintaining healthy vision and immune function. |
| Eggs | Lutein & Zeaxanthin | High-quality protein that supports eye health and muscle repair. |
| Cocoa Powder | Magnesium | Important for bone health and nerve function. |
5. Aesthetic Staging and Professional Presentation
To match the professional “pastry-chef” look of your photo, follow these staging principles:
- The “Clean Release”: Use a small offset spatula or a hot knife to go around the edges of the pan only after the cheesecakes have chilled for at least 4 hours. This ensures the sides remain smooth and vertical as seen in your image.
- Piping Precision: Use a large star tip (like a 1M or 2D) for the rosettes. Start in the center, move outward, and pull up sharply to get that elegant “swirl” finish.
- The Garnish Texture: Adding a single shard of shaved chocolate or a sprinkle of cocoa nibs on top of the rosette (as seen in the foreground of your photo) adds a final layer of artisanal detail.
6. Frequently Asked Questions (FAQ)
Why did my cheesecake layer pull away from the brownie?
This usually happens if the brownie layer was too dry or if there was too much air whipped into the cheesecake batter. Always tap your cheesecake batter on the counter before baking to release air bubbles.
Can I make these in a standard muffin tin?
Yes, but you must use high-quality paper liners or the cheesecakes will stick. For the professional “exposed side” look in your photo, a silicone mini-cheesecake pan with removable bottoms is the best tool.
How long do these stay fresh?
Because of the high moisture content of the cheesecake, these are best consumed within 3 to 4 days. Keep them in an airtight container in the refrigerator to prevent the brownie from absorbing “fridge smells”.
7. Culinary Inspiration: Integrating Your Gallery
These mini cheesecakes are a versatile dessert that can be part of a larger gourmet menu:
- The “Small Bites” Buffet: Serve these alongside your No-Bake Raspberry Coconut Balls for a beautiful “Black and White” dessert spread.
- The Coffee Pairing: The richness of the brownie and ganache makes these the perfect accompaniment to a strong espresso or a creamy Oreo Frappuccino.
- The After-Steak Finale: After a heavy meal like your Rosemary Garlic Steak, these mini portions provide just enough sweetness without being overwhelming.
- The Fruit Contrast: Serve one of these cheesecakes on a plate with a few fresh berries, using the technique from your Chocolate Fruit Parfait to add a burst of acidity.