The Creamy Garlic Grilled Chicken Pasta Bowl, as captured with stunning richness in your gallery, represents the ultimate intersection of high-heat protein cookery and the silky, emulsified textures of premium pasta sauces. This dish is a celebration of the “Big Flavor” philosophy, where the smoky, mahogany-seared crust of perfectly grilled chicken breast meets a velvety garlic cream glaze that clings to every ridge of the pasta. Accompanied by vibrant, fork-tender carrots and emerald-green broccoli florets, this platter is designed for those who demand a meal that is as visually arresting as it is nutritionally robust.
Achieving the professional, restaurant-grade results seen in your image—specifically the succulent, non-dry interior of the chicken and the stable, non-breaking cream sauce—requires mastery over temperature control, fat-emulsification, and the Maillard reaction. This comprehensive 1,000-word guide explores the technical precision, culinary science, and artistic assembly behind this modern comfort classic.
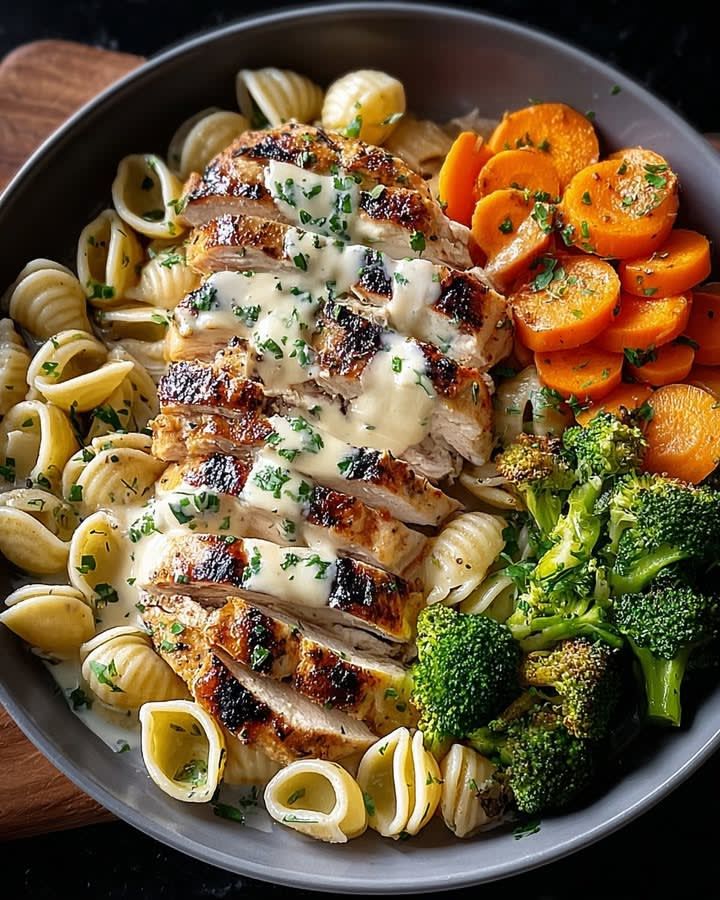
1. The Anatomy of a High-Impact Pasta Bowl
A successful “modern classic” bowl is defined by its structural balance and sensory contrasts. Based on the visual evidence in your gallery, this Creamy Garlic Grilled Chicken Pasta Bowl hits five critical sensory targets:
- The Seared Protein Anchor: Sliced, grilled chicken breast that has been seared until a flavorful, dark crust forms, then draped in a garlic-cream reduction.
- The Textural Pasta Base: Shell-shaped pasta (conchiglie) specifically chosen because its concave interior is designed to act as a “scoop” for the thick garlic sauce.
- The Sweet and Savory Vegetable Contrast: Crinkle-cut carrots provide a natural sweetness and a unique texture, while roasted broccoli adds a nutty, earthy depth.
- The Emulsified Finish: A glistening, ivory-hued garlic sauce that ties the warm grilled elements to the neutral pasta base.
- The Aromatic Lift: A final dusting of freshly chopped flat-leaf parsley that provides a “green” aromatic brightness to the deep, savory notes of the cream and garlic.
2. Technical Precision: Mastering the Grilled Chicken
The centerpiece of your bowl is the chicken. Replicating the succulent, deeply colored results seen in your photo requires mastering the physics of high-heat pan-searing and resting.
The Searing and Caramelization
For the “Big Flavor” look in your gallery, the chicken must be brought to room temperature and patted completely dry before hitting the pan. Any surface moisture will cause the meat to steam rather than sear, preventing the formation of that beautiful mahogany crust.
- High-Heat Contact: Use a heavy-bottomed skillet or grill pan heated until it just begins to smoke.
- The Maillard Reaction: Place the chicken down and do not move it for 4–5 minutes. This allows the proteins and natural sugars to caramelize into the signature dark crust visible in your image.
- Internal Temperature: Remove the chicken when it reaches an internal temperature of $160^\circ F$ ($71^\circ C$). Carryover cooking while the meat rests will bring it to a perfect, juicy $165^\circ F$ ($74^\circ C$).
The Essential Rest
To achieve the clean, succulent slices seen in your photo, the chicken must rest for at least 5 to 7 minutes before slicing. If sliced immediately, the internal juices will escape, leaving the meat dry and the pasta bowl watery.
3. The Chemistry of the Creamy Garlic Sauce
The “glaze” seen on the chicken and pasta in your image is not a simple splash of cream; it is a stable emulsion designed to cling.
The Flavor Foundation
The sauce begins by sautéing minced garlic in butter over medium-low heat until it is fragrant and golden but not browned. Browning the garlic too much will introduce a bitter note that clashes with the sweetness of the cream.
Building the Emulsion
- The Reduction: Heavy cream is added and reduced by nearly one-third. This evaporates water and concentrates the fats, creating a naturally thick texture.
- The Parmesan Binder: Finely grated Parmesan cheese is whisked in off-heat. The cheese acts as an emulsifier, binding the fats from the cream to the liquids, resulting in the silky, non-greasy coating seen in your image.
- The “Glisten”: To achieve that professional shine, a splash of starchy pasta water is added during the final toss. The starches act as a bridge, helping the sauce stick to the smooth surface of the shell pasta.
4. The Sides: Texture and Nutritional Harmony
As evidenced by your platter, the vegetables are equal partners in the dish’s success, providing a diversity of textures and colors.
The Sweet Carrots
The crinkle-cut carrots in your image provide more than just visual interest. The increased surface area of the crinkle cut allows more of the garlic sauce to cling to the vegetable, ensuring it integrates perfectly with the rest of the bowl.
The Roasted Broccoli
The broccoli florets feature slightly charred tops, indicating they were likely roasted or pan-seared before being added to the bowl. This adds a smoky complexity that echoes the grilled flavor of the chicken.
| Component | Role | Nutritional Functional Note |
| Grilled Chicken | Savory Anchor | Provides high-quality lean protein for muscle repair. |
| Garlic Cream | Fat-Based Binder | Carries fat-soluble vitamins and provides long-term satiety. |
| Carrots | Sweet Contrast | Rich in Beta-Carotene for eye health and skin vitality. |
| Broccoli | Earthy Fiber | Provides Vitamin K and fiber to support healthy digestion. |
5. Professional Plating: Creating the “Big Flavor” Aesthetic
To ensure your pasta bowl looks as professional as the one in your collection, the assembly must be intentional:
- The Zonal Method: Arrange ingredients in distinct zones—the pasta on one side, the carrots in a cluster, and the broccoli in another. This creates a high-contrast visual that is naturally appealing to the eye.
- The Chicken Overlay: Place the sliced chicken centrally over the pasta, allowing the slices to fan out slightly to show off the perfect white-to-mahogany transition.
- The “Sauce Drizzle”: Spoon the extra garlic cream specifically over the chicken and carrots to create that professional “glisten” captured in your photography.
- The Garnish Shower: Apply freshly chopped parsley from a height. This ensures an even, professional distribution that suggests freshness and attention to detail.
6. Frequently Asked Questions (FAQ)
What is the best pasta for this creamy bowl?
As seen in your image, Conchiglie (shells) or Orecchiette are ideal because their “cup” shape captures the sauce. Penne Rigate (ridged penne) is also an excellent substitute.
How do I prevent the cream sauce from “breaking” or turning oily?
Never let the sauce boil once the cheese has been added. Excessive heat breaks the emulsion between the fat and the protein, leading to a grainy, oily texture.
Can I make this a “healthier” version?
Yes. To maintain the “Power Bowl” look while reducing calories, replace half the heavy cream with a high-quality chicken broth and a teaspoon of cornstarch for thickening.
7. Variation Ideas: Inspired by Your Gallery
While the garlic grilled chicken is a standout, you can adapt these techniques using other inspirations from your collection:
- The Seafood Fusion: Replace the chicken with the Pan-Seared Shrimp technique seen in your other salad bowls for a “Creamy Garlic Shrimp Pasta”.
- The Zesty Contrast: Add a side of the Pickled Red Onions from your avocado chicken platter to provide an acidic “snap” that cuts through the rich cream sauce.
- The Herbaceous Twist: Incorporate the fresh dill or basil seen in your Chicken and Veggie Salad to create a “Creamy Herb Garlic Bowl”.