Why These Bars Are So Popular
No-bake chocolate peanut butter oat bars are popular for several reasons:
- No oven required
- Simple pantry ingredients
- Rich chocolate flavor
- Chewy, satisfying texture
- Easy to cut, store, and transport
They are forgiving, adaptable, and nearly impossible to mess up. Even beginner cooks can make them with confidence.
Ingredients You’ll Need
For the Oat Base and Topping
- 3 cups rolled oats (old-fashioned oats work best)
- ¾ cup unsalted butter
- ½ cup brown sugar
- 1 teaspoon vanilla extract
- A pinch of salt
For the Chocolate Peanut Butter Layer
- 1½ cups milk chocolate chips (or semi-sweet if you prefer less sweetness)
- ¾ cup creamy peanut butter
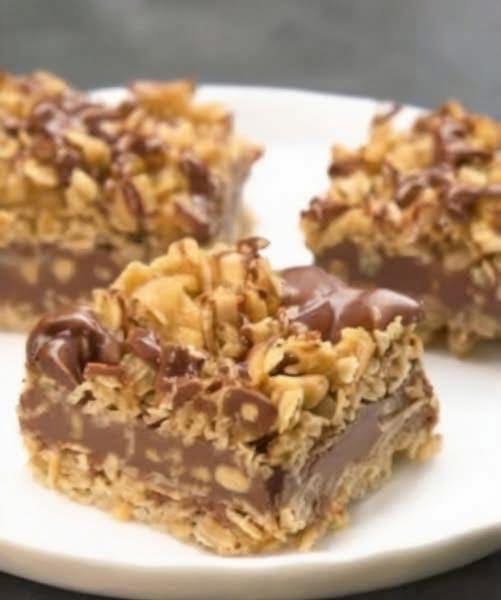
These ingredients create the classic flavor you see in the image: chewy oats combined with a smooth, rich chocolate center.
Choosing the Right Oats
Rolled oats are essential for this recipe. Quick oats tend to become mushy, while steel-cut oats are too hard and chewy. Rolled oats provide structure, chewiness, and that signature homemade texture.
If you want a slightly crunchier bar, you can lightly toast the oats in a dry pan for 5 minutes before using them.
Preparing the Oat Mixture
In a medium saucepan, melt the butter over medium heat. Once melted, add the brown sugar and salt. Stir continuously until the sugar dissolves and the mixture becomes glossy and smooth.
Remove from heat and stir in the vanilla extract. Immediately add the rolled oats and mix well until every oat is coated.
The mixture should feel thick but moist—not dry, not runny.
Dividing the Mixture
Take about two-thirds of the oat mixture and press it firmly into the bottom of a lined or greased square baking dish (about 20 × 20 cm or 8 × 8 inches).
Use the back of a spoon or spatula to press it down evenly. This forms the sturdy base of the bars.
Set the remaining oat mixture aside for the topping.
Making the Chocolate Peanut Butter Layer
In a heatproof bowl, combine the chocolate chips and peanut butter. Melt them together using one of the following methods:
- Microwave: Heat in 30-second intervals, stirring between each
- Double boiler: Gently melt over simmering water
Stir until completely smooth and glossy. This layer should be thick, creamy, and luxurious.
Assembling the Bars
Pour the melted chocolate-peanut butter mixture over the oat base. Spread it evenly using a spatula, making sure it reaches all corners.
Next, sprinkle the remaining oat mixture over the top. Gently press it down so it sticks to the chocolate layer but doesn’t sink completely.
This creates the layered look seen in the image—distinct yet cohesive.
Chilling and Setting
Place the dish in the refrigerator for at least 2 hours, or until fully set. This step is essential for clean slicing and proper texture.
Once chilled, remove from the fridge and let it sit at room temperature for 5 minutes before cutting.
Cutting the Bars
Use a sharp knife and wipe it clean between cuts for neat edges. Cut into squares or rectangles depending on your preference.
These bars are rich, so smaller portions work well.
Texture and Flavor Profile
- Bottom layer: chewy, buttery oats
- Middle layer: smooth, rich chocolate-peanut butter
- Top layer: crunchy, slightly crumbly oats
The combination creates a dessert that feels indulgent without being overwhelming.
Helpful Tips for Perfect Results
- Press the oat layers firmly to prevent crumbling
- Use good-quality chocolate for better flavor
- Let bars chill completely before slicing
- Store in the fridge for best texture
Variations You Can Try
Chocolate Choices
- Dark chocolate for a less sweet version
- White chocolate for a sweeter twist
- A mix of milk and dark chocolate
Nut Butter Swaps
- Almond butter
- Cashew butter
- Sunflower seed butter (nut-free)
Add-Ins
- Chopped nuts
- Coconut flakes
- Rice crisps for extra crunch
Storage Instructions
- Refrigerator: up to 1 week in an airtight container
- Freezer: up to 2 months (slice before freezing)
Let frozen bars thaw slightly before serving.
When to Serve These Bars
These no-bake chocolate peanut butter oat bars are perfect for:
- Family desserts
- Bake sales (even though they’re no-bake)
- Lunchbox treats
- Holiday trays
- Quick sweet cravings
They travel well and stay firm, making them ideal for sharing.
Why This Recipe Always Works
The magic of this recipe lies in its simplicity. There’s no baking, no complicated timing, and no special equipment. The ingredients naturally bind together, and the flavors complement each other perfectly.
It’s the kind of dessert that feels homemade in the best way—slightly rustic, deeply comforting, and incredibly satisfying.
Final Thoughts
These no-bake chocolate peanut butter oat bars are proof that simple recipes can deliver big flavor. With chewy oats, rich chocolate, and creamy peanut butter, they offer everything people love in a dessert—without turning on the oven.