🍰 The Art of the Layer: A Dessert of Sophistication and Simplicity
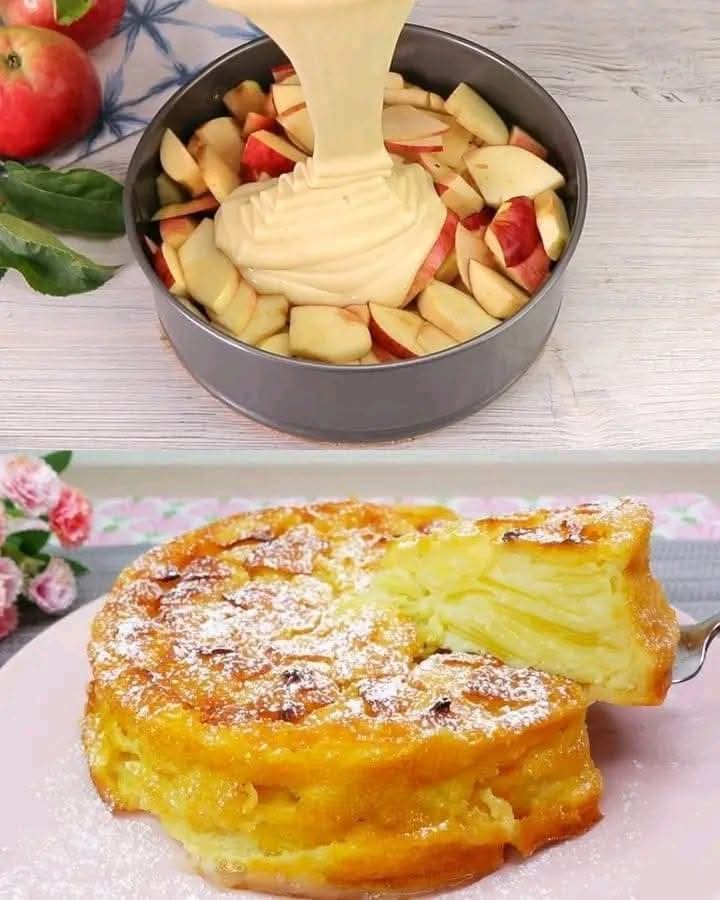
This Elegant French-Style Layered Apple Cake is a masterful dessert that belies its simple preparation. It takes cues from traditional European apple cakes like the moist Sharlotka and the artistic presentation of a classic French Tarte Tatin. The secret to this cake’s charm, and its photogenic appearance, is the meticulous, overlapping arrangement of thinly sliced apples at the base of the springform pan, over which a simple, buttery batter is poured. As the cake bakes, the batter rises around the apples, leaving the top layer perfectly exposed to caramelize and form a tender, decorative crust, resulting in the gorgeous spiral pattern seen in the final image. This cake is light, incredibly moist, and the subtle spices and lemon zest ensure the sweet apples remain the star. It is the perfect centerpiece for a holiday table, a sophisticated brunch, or a simple afternoon tea.
📝 Ingredients You’ll Need (Achieving the Perfect Batter)
The use of both butter and oil helps achieve an incredibly tender and moist crumb, preventing the cake from drying out during the long bake time required for the apples.
For the Apples:
- 4-5 Medium Apples (such as Honeycrisp, Gala, or a mix of sweet and tart), peeled, cored, and very thinly sliced (about 1/16 to 1/8 inch thick).
- 1 tablespoon Fresh Lemon Juice (to prevent browning).
- 1/4 cup Granulated Sugar.
- 1 teaspoon Ground Cinnamon.
For the Cake Batter:
- 1 1/2 cups All-Purpose Flour.
- 2 teaspoons Baking Powder.
- 1/2 teaspoon Salt.
- 1/2 cup Unsalted Butter, softened to room temperature.
- 1/4 cup Vegetable Oil (or a light-flavored oil like Canola).
- 1 cup Granulated Sugar.
- 3 large Eggs, at room temperature.
- 1 teaspoon Vanilla Extract.
- 1/2 cup Whole Milk or Buttermilk, at room temperature.
- Zest of 1/2 Lemon (optional, for brightness).
For Finishing:
- Powdered Sugar (Confectioners’ Sugar), for a beautiful final dusting.
🔪 Step-by-Step Cooking Instructions (Building the Beautiful Spiral)
The precise arrangement of the apples is the key step to replicating the cake’s signature look.
1. Prepare the Pan and Apples
- Preheat your oven to 350^\circ\text{F} (175^\circ\text{C}).
- Pan Prep: Grease and flour a 9-inch springform pan. Line the bottom of the pan with a circle of parchment paper—this is crucial for easy release and prevents the caramelized juices from sticking.
- Apple Prep: In a bowl, toss the thinly sliced apples with the lemon juice, 1/4 cup of sugar, and the cinnamon.
- The Layering: Start arranging the apple slices from the outside edge of the pan, working your way inward in a tight, overlapping spiral pattern until the entire base is covered (as seen in the top image).
2. Mix the Dry Ingredients
- In a medium bowl, whisk together the all-purpose flour, baking powder, and salt. Set the dry ingredients aside.
3. Cream the Fats and Sugar
- In a large mixing bowl, beat the softened butter, vegetable oil, and 1 cup of granulated sugar until the mixture is light and fluffy (about 3-4 minutes). This creaming incorporates air, giving the cake a light texture.
- Beat in the eggs one at a time, followed by the vanilla extract and lemon zest (if using). Scrape down the sides of the bowl.
4. Finish the Batter
- With the mixer on low speed, alternate adding the dry ingredients and the milk, beginning and ending with the dry ingredients. Start by adding one-third of the flour mixture and mixing until just combined.
- Add half of the milk, mix until combined.
- Add the second third of the flour, mix.
- Add the rest of the milk, mix.
- Finally, add the remaining flour and mix only until the batter is smooth. Stop immediately to avoid overmixing.
5. Bake the Cake
- Carefully pour the cake batter evenly over the meticulously arranged apple slices. The batter should cover the apples completely.
- Bake for 55 to 70 minutes. Because of the moisture from the apples, the cake needs a long bake time.
- The cake is done when a wooden skewer or toothpick inserted into the center comes out clean or with just a few moist crumbs attached.
6. Cool and Finish
- Let the cake cool in the springform pan on a wire rack for 15 minutes.
- Run a thin knife around the edge of the cake to ensure it hasn’t stuck, then release the springform ring.
- Allow the cake to cool for an additional 30 minutes. If the apples seem to be sticking to the parchment paper, you can gently place a cooling rack on top of the cake, invert it, peel the parchment off the bottom, and then invert it back onto the serving plate.
- Presentation: Just before serving, generously dust the entire top surface of the cake with powdered sugar (Confectioners’ Sugar) for the perfect finish, highlighting the beautiful layered apple design.
⭐ Pro Tips and Recipe Variations (The Finishing Touches)
- Cutting the Apples: The thinner the slices, the more tender and uniform they will be when baked. Use a mandolin if available for perfect, uniform slices, otherwise a very sharp knife is sufficient. Uniformity ensures even baking.
- The Parchment Paper: Do not skip lining the bottom of the springform pan with parchment paper. As the apples release their juices and caramelize, they will stick to the metal, making removal difficult.
- Serving Warm: This cake is delicious served slightly warm, perhaps with a scoop of vanilla bean ice cream or a drizzle of warm caramel sauce. The contrast between the warm cake and the cool ice cream is wonderful.
- Spice Upgrade: For a more autumnal, deeper flavor profile, add 1/4 teaspoon of ground nutmeg and 1/8 teaspoon of ground cardamom to the dry ingredients.
- Buttermilk Swap: Using buttermilk instead of regular whole milk will react slightly with the baking soda, resulting in an even lighter, more tender, and tangier crumb.