Ingredients (Very Simple)
You only need 3 basic ingredients:
- 2 liters full-fat milk (fresh, not ultra-pasteurized)
- 3–4 tablespoons lemon juice OR white vinegar
- ½ teaspoon salt (optional)
👉 Optional additions:
- 1 tablespoon cream or butter (extra richness)
- Herbs (thyme, oregano, parsley)
- Honey or sugar (for sweet version)
🍶 Best Milk to Use (Important)
🥇 Ideal Choice
- Fresh whole milk
- Local or farm milk if available
⚠️ Avoid
- Ultra-high temperature (UHT) milk
- Low-fat or skim milk
👉 Full-fat milk gives:
- Better texture
- Creamier taste
- Higher cheese yield
🔥 Step 1: Heating the Milk
Pour the milk into a large heavy-bottom pot.
- Heat over medium heat
- Stir gently to prevent burning
- Bring to a gentle boil (not aggressive)
⏱ Time: 10–15 minutes
🌡 Temperature: Around 85–90°C
You will see steam rising and small bubbles forming around the edges.
🍋 Step 2: Curdling the Milk
Once the milk is hot:
- Lower the heat
- Add lemon juice slowly, 1 tablespoon at a time
- Stir gently after each addition
Within seconds, you will see:
- Milk separating into white curds
- Pale yellow liquid (whey)
If separation is not clear:
- Add 1 more tablespoon lemon juice
- Do not over-stir
✅ When fully curdled, turn off the heat.
🧪 Step 3: Resting the Curds
Let the pot sit undisturbed for 10 minutes.
This allows:
- Curds to firm up
- Whey to separate fully
Do not skip this step—it affects texture greatly.
🧺 Step 4: Straining the Cheese
Line a colander with:
- Clean cheesecloth
- Or thin cotton cloth
Carefully pour the curds and whey into the cloth.
Let it drain naturally for 5–10 minutes.
💡 Tip: Save the whey!
It’s rich in nutrients and can be used for:
- Bread dough
- Pancakes
- Smoothies
- Soup base
🧂 Step 5: Seasoning (Optional)
While the cheese is still warm, you may add:
- Salt
- Herbs
- Cracked pepper
- Garlic powder
Mix gently using clean hands or a spoon.
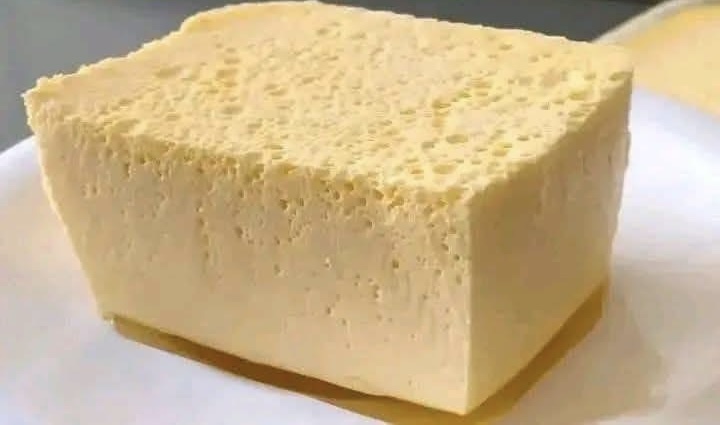
🧱 Step 6: Shaping & Pressing (Key for Block Shape)
To get that perfect rectangular block like in the image:
- Transfer the cheese into a glass or plastic container
- Fold cloth neatly over the top
- Place a flat plate on top
- Add a small weight (jar of water)
⏱ Pressing Time:
- 30 minutes = very soft
- 1 hour = sliceable
- 2 hours = firm block
Do not over-press or it will become dry.
❄️ Step 7: Cooling & Setting
After pressing:
- Remove weight
- Refrigerate for 1–2 hours
This allows the cheese to:
- Fully set
- Hold clean edges when cut
Once chilled, unmold gently and slice.
🍽️ Texture & Taste
This cheese is:
- Soft yet firm
- Light and airy
- Mild, creamy, and fresh
It absorbs flavors beautifully and works in both sweet and savory dishes.
🍯 Sweet Serving Ideas
- Drizzle with honey
- Add jam or fruit syrup
- Sprinkle cinnamon or vanilla sugar
- Serve with dates or figs
Perfect for breakfast or dessert.
🧄 Savory Serving Ideas
- Pan-fry lightly in olive oil
- Add to salads
- Serve with bread and olives
- Season with zaatar or chili flakes
Excellent as a protein-rich meal.
🧊 Storage Tips
- Store in airtight container
- Refrigerate up to 3–4 days
- Keep slightly covered with whey or milk to stay moist
❌ Do not freeze (texture will change)
❗ Common Mistakes to Avoid
- Using UHT milk
- Adding acid too fast
- Over-pressing
- Skipping resting time
- Squeezing curds aggressively
Patience = perfect cheese.
🌍 Why This Cheese Is So Popular
✔ Cheap ingredients
✔ No special tools
✔ Healthy & natural
✔ High protein
✔ Kid-friendly
It’s a traditional recipe passed through generations, loved for its simplicity and purity.
🧡 Final Thoughts
This homemade fresh milk cheese is one of the easiest and most rewarding recipes you can make. With just milk and lemon, you create something beautiful, nutritious, and versatile—exactly like the soft, elegant block shown in your image.