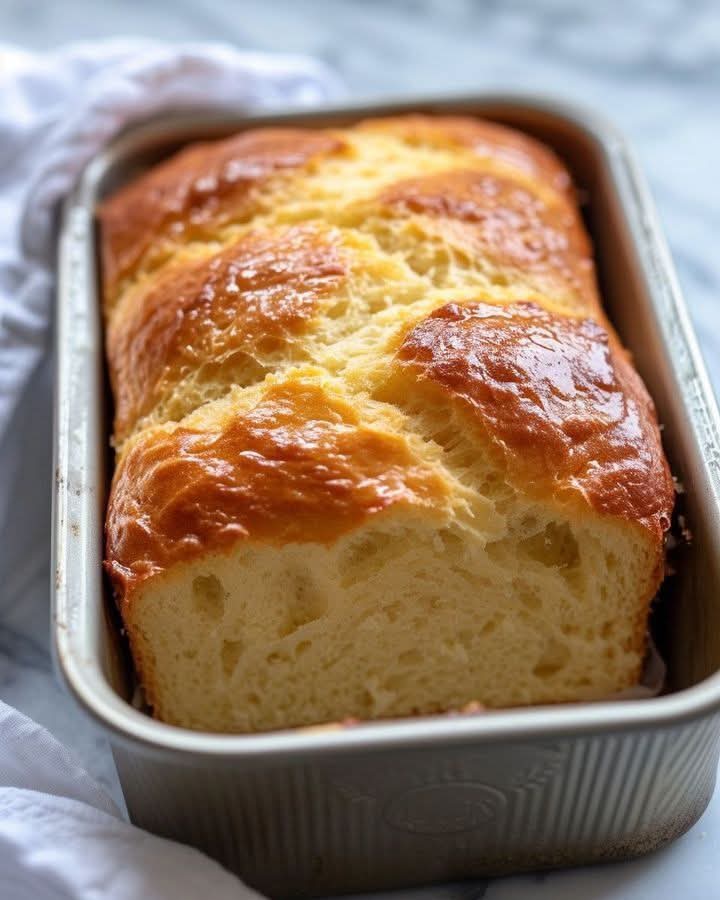
Brioche is one of the most beloved breads in the world—rich, buttery, slightly sweet, and incredibly soft with a delicate crumb. What makes brioche special is the addition of eggs and butter to the dough, which transforms a basic bread into something closer to a pastry. The loaf in the picture is a perfect example of classic brioche: a shiny brown top, a pillowy interior, and that signature buttery aroma. This recipe will walk you through everything you need to know to make this luxurious loaf yourself, even if you’re a beginner baker.
🍞 Ingredients (for 1 large loaf)
Dry Ingredients
3 ½ cups (420 g) all-purpose flour or bread flour
¼ cup (50 g) sugar
1 teaspoon fine salt
2 ¼ teaspoons (1 packet) instant yeast
Wet Ingredients
4 large eggs (room temperature)
⅓ cup (80 ml) warm milk (not hot)
1 teaspoon vanilla extract (optional)
Butter
10 tablespoons (140 g) unsalted butter, softened to room temperature, cut into chunks
Egg Wash
1 egg
1 tablespoon milk
⭐ Step-by-Step Instructions
Step 1: Prepare the Dough
Begin by mixing the warm milk and yeast in a bowl if you’re using active dry yeast. Let it sit for 5 minutes to activate. If you are using instant yeast, you can skip this step and add it directly to the dry ingredients. Using a stand mixer makes this recipe much easier because brioche dough is sticky and enriched, but you can knead it by hand with patience.
In the bowl of your mixer, combine flour, sugar, salt, and yeast. Mix briefly. Add the eggs, vanilla, and milk. Mix on low speed until a shaggy dough forms. It will look rough at first, but that’s expected.
Increase the speed to medium and allow the dough to knead for about 5–7 minutes. The dough should begin to smooth out and pull away from the sides of the bowl slightly, but it will still be sticky.
Step 2: Add the Butter Slowly
This is where brioche becomes brioche. Butter transforms the dough, but adding it too fast will cause it to slip apart. Add only two to three pieces of softened butter at a time, mixing thoroughly after each addition.
This stage takes about 7–10 minutes. As the butter blends in, the dough will look shiny, smooth, stretchy, and beautifully elastic. It should pass the windowpane test—when you stretch a small piece, it should become thin and almost transparent before tearing.
The dough will be sticky, and that’s normal. Resist the temptation to add extra flour, as that will make the brioche dense.
⭐ Step 3: First Rise (Slow Fermentation)
Grease a large bowl lightly with butter or oil. Place the dough inside, cover with plastic wrap, and let it rise.
You have two options:
Option A — Room Temperature Rise (1–2 hours)
The dough doubles quickly but develops less flavor.
Option B — Overnight Refrigeration (8–12 hours) ⭐ Recommended
This method gives your brioche a buttery, deep aroma and makes the dough easier to handle the next day.
The dough will firm up in the fridge, making shaping much easier.
⭐ Step 4: Shape the Brioche
Lightly flour your hands and a work surface. Gently deflate the dough—it should feel soft and wonderfully airy. You can shape your brioche in two ways:
Classic Brioche Loaf
Divide the dough into 3 or 4 equal parts. Roll each piece into a tight ball and line them inside your loaf pan. This technique gives the loaf that signature pull-apart look.
Single Dough Mass
Simply shape the whole dough into a log and place it inside the loaf pan. This creates a smoother top, like the bread in your picture.
Cover the pan with a cloth and let it rise again for 45–90 minutes, depending on room temperature. The dough should rise slightly above the rim of the pan—not too much, not too little.
⭐ Step 5: Brush with Egg Wash
Mix 1 egg with 1 tablespoon of milk. Brush the top gently.
This step is what gives brioche its shiny, golden crust.
Be careful not to press too hard or the dough may deflate.
⭐ Step 6: Bake the Brioche
Preheat your oven to 175°C (350°F).
Bake for 30–35 minutes, or until the top is glossy brown and the kitchen smells like butter and heaven.
If the top browns too quickly, loosely place foil over the loaf halfway through baking.
The internal temperature should read 88–93°C (190–200°F) if using a thermometer.
⭐ Step 7: Cool and Glaze (Optional)
When the brioche comes out of the oven, you can brush the top with a bit of melted butter or honey for an extra-soft sheen. Allow the loaf to cool at least 20 minutes before slicing. This is the hardest part—brioche smells irresistible!
⭐ Storage Tips
Room Temperature: Wrap tightly and store up to 3 days.
Freezer: Slice and freeze for 2 months; toast to reheat.
Refresh: Warm slices briefly in a microwave or oven for softness.
⭐ What Makes This Brioche Special?
This recipe creates a loaf that is:
Feather-light and ultra fluffy
Sweet and buttery
Perfect for breakfast, French toast, or sandwiches
Golden and shiny like a bakery loaf
Soft enough to tear by hand
The slow addition of butter and the overnight rise give this brioche bakery-level texture, better than most store-bought versions.
⭐ Serving Ideas
Here are some delicious ways to enjoy your homemade brioche:
Fresh with butter and jam
Toasted with honey
As a base for French toast
For gourmet sandwiches
As bread for sweet cream-filled desserts