Ingredients You Will Need
For the Crust
• 2 ½ cups crushed graham crackers or tea biscuits
• ½ cup melted butter
• ¼ cup sugar (optional, if your biscuits are already sweet)
For the Pineapple Cream Layer
• 1 can (20 oz / 565g) crushed pineapple, well drained
• 1 box (3.4 oz / 96g) instant vanilla pudding mix
• 1 ½ cups cold milk
• 1 cup softened cream cheese
• ½ cup powdered sugar
• 1 teaspoon vanilla extract
For the Whipped Topping
• 2 cups heavy whipping cream (or 1 large tub whipped topping)
• 3 tablespoons powdered sugar
• ½ teaspoon vanilla extract
⸻
Preparing the Crumb Crust
The base layer is crucial because it provides structure and a slight crunch, balancing the creamy layers above it.
Start by crushing your graham crackers or tea biscuits. You can do this using a food processor or simply place them in a sealed bag and crush with a rolling pin. The crumbs should be fine and even for a smooth crust.
Pour the crumbs into a mixing bowl and add melted butter. Stir until every crumb is moistened and the mixture resembles wet sand. If you prefer a slightly sweeter crust, add the optional sugar.
Line your baking pan with parchment paper — this allows you to lift the bars easily when cutting. Press the crust mixture firmly into the bottom of the pan. Use the back of a spoon or a flat glass to pack it tightly. Place it in the refrigerator for at least 20 minutes to allow it to set and harden.
⸻
Making the Pineapple Cream Filling
This layer is the heart of the dessert, giving it a bright tropical flavor and creamy texture.
Begin by preparing the vanilla pudding. In a mixing bowl, whisk the pudding mix with cold milk until it thickens. Instant pudding typically thickens quickly, so set it aside once it reaches a smooth, pudding-like consistency.
In another bowl, beat the softened cream cheese with powdered sugar until smooth and fluffy. This step ensures there are no lumps and the final filling remains silky.
Stir the pudding mixture into the cream cheese mixture. Blend until fully combined. Add vanilla extract to enhance the flavor.
Next, fold in the drained crushed pineapple. Take care to drain the pineapple well, pressing out excess juice if necessary to prevent the filling from becoming too runny. Blend gently until the pineapple is evenly distributed.
This creamy pineapple layer should be thick enough to hold its shape, but soft enough to spread smoothly over the crust.
⸻
Assembling the Dessert
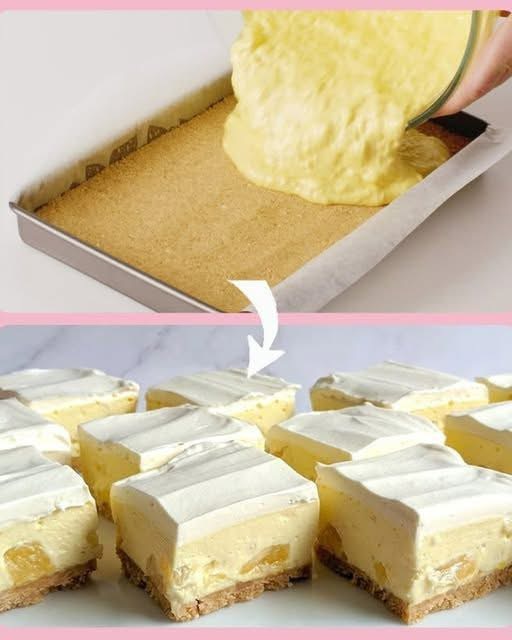
Remove your chilled crust from the refrigerator. Pour the pineapple cream filling over the crust, spreading it into an even layer. Use a spatula to smooth the top carefully.
Place the pan back into the refrigerator for at least one hour. This helps the pineapple layer firm up before adding the whipped topping. Proper chilling at this stage ensures clean, sharp layers when sliced.
⸻
Preparing the Whipped Topping
If using homemade whipped cream, pour your cold heavy cream into a chilled mixing bowl. Add powdered sugar and vanilla extract. Beat on high speed until soft peaks form — do not overwhip or it may become grainy.
Spread the whipped cream evenly over the chilled pineapple cream layer. Create decorative swirls or keep it smooth, depending on your preference. If you’re using whipped topping, simply spread it across evenly.
Chill the dessert for another 2–4 hours, or overnight for the best results. The longer it sits, the better it cuts and the more cohesive the flavors become.
⸻
How to Cut Perfect Squares
Once fully chilled, lift the dessert from the pan using the parchment paper edges. Use a long, sharp knife dipped in hot water and wiped dry to slice clean squares.
Cut into 12–16 bars depending on the size you desire. In the image you provided, the bars are square and thick, so aim for medium-sized pieces that highlight the layers.
⸻
Tips for Best Results
Drain the Pineapple Well
Excess moisture can make the filling runny. Press the pineapple gently through a sieve to remove extra juice.
Chill Thoroughly
Rushing the chilling process may cause layers to blend. Allow enough time for the dessert to set properly.
Use Quality Cream Cheese
Full-fat cream cheese offers the best flavor and structure.
Double the Topping for Extra Creaminess
If you prefer a thick whipped topping layer, increase the whipped cream to 3 cups.
⸻
Flavor Variations
This recipe is endlessly adaptable. Here are some ideas to customize it to your taste:
Pineapple Coconut Bars
Add ½ cup shredded coconut to the pineapple cream layer or sprinkle on top for a tropical twist.
Lemon Pineapple Dream Bars
Add 2 tablespoons lemon juice and 1 teaspoon lemon zest to brighten the filling.
Strawberry-Pineapple Delight
Add a thin layer of sliced strawberries between the pineapple layer and whipped topping.
Banana Pineapple Cream Bars
Mix in sliced bananas for a banana-split style dessert.
Chocolate Crust Variation
Use crushed chocolate biscuits instead of graham crackers for a rich contrast.
Each variation enhances the original flavor while keeping the dessert easy and refreshing.
⸻
Storage Instructions
Refrigerator
Store in an airtight container for up to 4–5 days. The crust stays firm and the filling remains creamy.
Freezer
These bars freeze beautifully. Wrap tightly and freeze for up to 2 months. Thaw overnight in the refrigerator before serving.
⸻
Why This Dessert Is a Crowd Favorite
This dessert is beloved because it’s:
• No-bake, making it perfect for hot weather
• Creamy and refreshing, with a bright pineapple flavor
• Beautifully layered, giving it an elegant look
• Easy to slice and serve
• Crowd-pleasing, even for picky eaters
• Make-ahead friendly, ideal for parties
The combination of buttery crust, creamy pineapple filling, and airy whipped topping creates a dreamy balance of textures and flavors.
⸻
Final Thoughts
Pineapple Dream Dessert Bars are a delightful treat that’s incredibly simple to prepare yet looks impressively polished when served. Whether you’re hosting a family gathering, bringing dessert to a potluck, or just wanting something sweet and refreshing in the fridge, this recipe is a guaranteed winner.