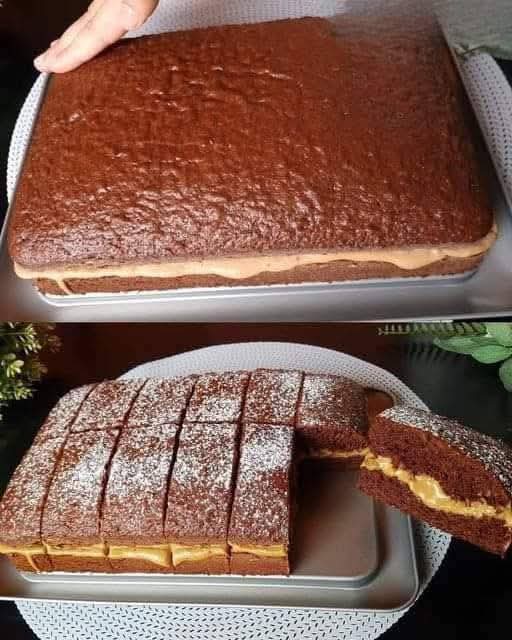
A soft chocolate cake filled with smooth caramel cream is one of the most comforting and indulgent desserts you can make at home. It’s a bakery-style treat that feels rich and luxurious, yet it’s surprisingly easy to prepare with simple ingredients. The cake shown in the image is made in a rectangular tray, sliced neatly into squares, and dusted lightly with powdered sugar, making it perfect for gatherings, tea time, birthdays, picnics, or even for selling as individual dessert squares. What makes this dessert irresistible is the combination of moist chocolate sponge layers and the creamy caramel filling that melts beautifully between them. With the right technique, you can create a cake that is tender, fluffy, and full of flavor.
This recipe is also highly SEO-friendly because it targets strong keywords like “chocolate caramel cake,” “tray bake cake,” “layered chocolate sheet cake,” “easy chocolate dessert,” “caramel cream filling,” and “moist chocolate sponge.” Readers often search for a dessert that is simple to cut and serve, especially for large families or events. The detailed instructions below ensure reliable results even for beginners and guarantee a soft, even-textured cake with a smooth, stable filling.
Ingredients
For the chocolate cake
- 2 cups all-purpose flour
- 1 cup sugar
- ½ cup cocoa powder
- 1 tablespoon baking powder
- ½ teaspoon baking soda
- ½ teaspoon salt
- 3 large eggs
- 1 cup milk
- ½ cup vegetable oil
- 1 cup hot water or hot coffee
- 1 tablespoon vanilla extract
For the caramel cream filling
- 1 cup caramel sauce (store-bought or homemade)
- 1 cup unsalted butter, softened
- 1 cup sweetened condensed milk
- ½ teaspoon vanilla
- Pinch of salt
For topping
- Powdered sugar (optional)
Preparing the chocolate sponge
A good chocolate cake starts with a well-balanced batter that combines richness with airiness. Begin by preheating your oven to 180°C (350°F). Line a large rectangular baking tray with parchment paper to ensure easy release later. In a mixing bowl, whisk together the flour, sugar, cocoa powder, baking powder, baking soda, and salt. These dry ingredients form the foundation of the sponge and should be well combined to avoid clumps.
In another bowl, whisk the eggs, milk, oil, and vanilla until smooth. Gradually add the wet mixture to the dry ingredients while stirring gently. At this stage, the batter will be thick. Now pour in the hot water or hot coffee—it may seem unusual, but the heat helps bloom the cocoa powder, making the cake richer and softer. Mix until the batter becomes smooth and slightly runny.
Pour the cake batter into the prepared tray and spread it evenly. Bake for 25–30 minutes or until a toothpick inserted into the center comes out clean. Allow the cake to cool completely. Cooling is essential because any warmth will melt the caramel cream and prevent clean layering.
Making the caramel cream filling
The filling is the highlight of this cake. It should be smooth, creamy, and thick enough to stay in place without oozing too much. Start by beating the softened butter with an electric mixer until it becomes fluffy and pale in color. Add the sweetened condensed milk gradually while mixing. Next, pour in the caramel sauce and continue beating until the mixture becomes smooth and creamy. Add vanilla and a pinch of salt. The salt enhances the caramel flavor and prevents it from tasting overly sweet.
If the filling is too soft, refrigerate it for 20 minutes before spreading. If it is too thick, add 1–2 tablespoons of cream or milk.
Assembling the layered cake
Once the chocolate cake is completely cool, gently remove it from the tray and place it on a cutting surface. Slice the cake horizontally into two equal layers. The easiest method is to use a long serrated knife and slide it through the middle using steady motions. If the cake seems delicate, you can leave it on a firm board while cutting to avoid breakage.
Lift the top half carefully and set it aside. Spread the caramel cream evenly over the bottom layer of the cake. Use a spatula to smooth the filling from edge to edge. Then replace the top half gently, pressing down very lightly so the layers adhere but the filling doesn’t spill out.
Chill the cake in the refrigerator for 30–45 minutes. This step ensures the filling sets properly and allows for perfectly neat slicing.
Cutting and presentation
After chilling, use a sharp knife to trim the edges for a clean, professional look (optional but recommended). Then cut the cake into squares as shown in the image. Wipe the knife between each cut for clean edges. Dust the top lightly with powdered sugar for a bakery-style finish.
This tray bake presentation is ideal for serving at parties, school events, cafés, or family gatherings. Each piece reveals a beautiful layer of caramel cream sandwiched between soft chocolate sponge.
Flavor and texture notes
The cake is airy yet moist, thanks to the hot water or coffee in the batter. The caramel cream filling is buttery, velvety, and not overly sweet when balanced with a touch of salt. The powdered sugar adds a simple but elegant presentation. The combination tastes like a chocolate-caramel cloud—rich but not heavy.
Tips for best results
- Use hot coffee instead of water for a deeper cocoa flavor.
- Do not skip the chilling step before slicing.
- If the caramel cream becomes soft, refrigerate again before assembling.
- Make sure the cake is fully cooled before adding filling.
- For thicker layers, bake the cake in a slightly smaller tray.
Variations
You can easily modify the filling by adding whipped cream, cream cheese, or chocolate chips. You can also add a drizzle of salted caramel between the layers for a stronger caramel punch. For a crunchier version, add crushed nuts such as pecans or hazelnuts to the filling.
Storage
This cake stores very well. Keep it refrigerated in an airtight container for up to 5 days. It also freezes beautifully—wrap individual squares and store them for up to 2 months. Thaw in the refrigerator before serving.
Final thoughts
This chocolate cake with caramel cream filling is a simple yet luxurious dessert that is guaranteed to please any crowd. Its soft texture, rich flavor, and beautiful layered appearance make it ideal for special occasions or everyday indulgence. With its easy ingredients and reliable method, it’s a recipe you’ll return to again and again, whether for your family or your food blog.